Create messenger bots using Elixir and Microsoft bot framework
Microsoft recently released the bot framework to create bots for various messaging platforms such as Slack, Facebook, Telegram etc. It provides a unified interface for all of these platforms so you can reach your customers wherever they are.
In this tutorial we are going to see how to create an Echo bot using Phoenix and Microsoft bot framework for Facebook. This involves the following steps
- Creating the service using Phoenix to receive messages from Microsoft bot framework.
- Deploy the service (we will do it on Heroku).
- Registering a bot with Microsoft bot framework.
- Registering a Facebook bot and linking with Microsoft bot service.
From here on I will refer to Microsoft bot framework as MBF.
Creating the bot service
MBF expects you to implement a web API that receives a message and in response either replies with the message to send back to the messenger or just a 200 OK response if you want to send the message asynchronously later on.
I've build the library ex_microsoftbot which is MBF API wrapper and the phoenix_microsoftbot which allows for easy creation of the web API for MBF to connect to. We will use both of them to create the service and send messages.
1. Create the project
Let's create a Phoenix project using mix phoenix.new echo_bot --no-ecto --no-html --no-brunch. We use --no-html, --no-brunch and --no-ecto because it's just a web API and for this simple bot we don't need any database.
Edit your mix.exs to include the dependencies
  # Configuration for the OTP application.
  #
  # Type `mix help compile.app` for more information.
  def application do
    [mod: {EchoBot, []},
     applications: [:phoenix, :cowboy, :logger, :gettext, :ex_microsoftbot]]
  end
....
....
  # Specifies your project dependencies.
  #
  # Type `mix help deps` for examples and options.
  defp deps do
    [{:phoenix, "~> 1.1.4"},
     {:gettext, "~> 0.9"},
     {:cowboy, "~> 1.0"},
     {:ex_microsoftbot, "~> 0.1.0"},
     {:phoenix_microsoftbot, "~> 0.1.0"}
    ]
  end
We also have to add ex_microsoftbot in the applications list as it internally uses HTTPotion which needs to be started.
2. Create the controller
Let's create a controller EchoBot.MessagesController under web/controllers/messages_controller.ex. Let's see the code it will contain and then I'll explain it.
defmodule EchoBot.MessagesController do
  use MicrosoftBot.Phoenix.Controller
  alias ExMicrosoftBot.Models.Message

  def message_received(conn, %Message{} = message) do
    echo_text =
      case message.text do
        nil -> "ECHO: (empty)"
        x -> "ECHO: " <> x
      end

    %{text: echo_text}
  end
end
We call use MicrosoftBot.Phoenix.Controller which will add some functions in the controller to interpret messages from MBF. You have to implement the message_received/2 callback, which will be called when a message from MBF is received. You can return a map from it which will be sent back as JSON or if you don't want to send back a message you can just call resp(conn, 200, "") to send back 200 OK.
Here we implement the message_received/2 and its second argument is of type ExMicrosoftBot.Models.Message containing all the information related to the message. We check the text of the message, if it is present we prepend ECHO: to it and send it back.
3. Add the route
The third step is to add the route which will use the newly created controller.
Edit web/router.ex to add the route
defmodule EchoBot.Router do
  use EchoBot.Web, :router
  use MicrosoftBot.Router

  microsoftbot_routes "/api/messages", EchoBot.MessagesController

end
The microsoftbot_routes will create a pipeline which will also validate the request coming in from MBF to see if it contains the correct credentials otherwise it will return 403 Forbidden.
Lastly just add the app_id and app_secret in the config config/prod.exs
config :microsoftbot,
  app_id: System.get_env("APP_ID"),
  app_secret: System.get_env("APP_SECRET")
As we will be deploying to Heroku so we will get the secrets from the environment variables.
That is all for creating a simple echo bot service.
You can deploy it to Heroku using the official Phoenix Heroku deployment guide.
If you are lazy or curious you can click the "Deploy to Heroku" button in the github project for the echo bot for easy deployment.
Register bot with Microsoft Bot Framework
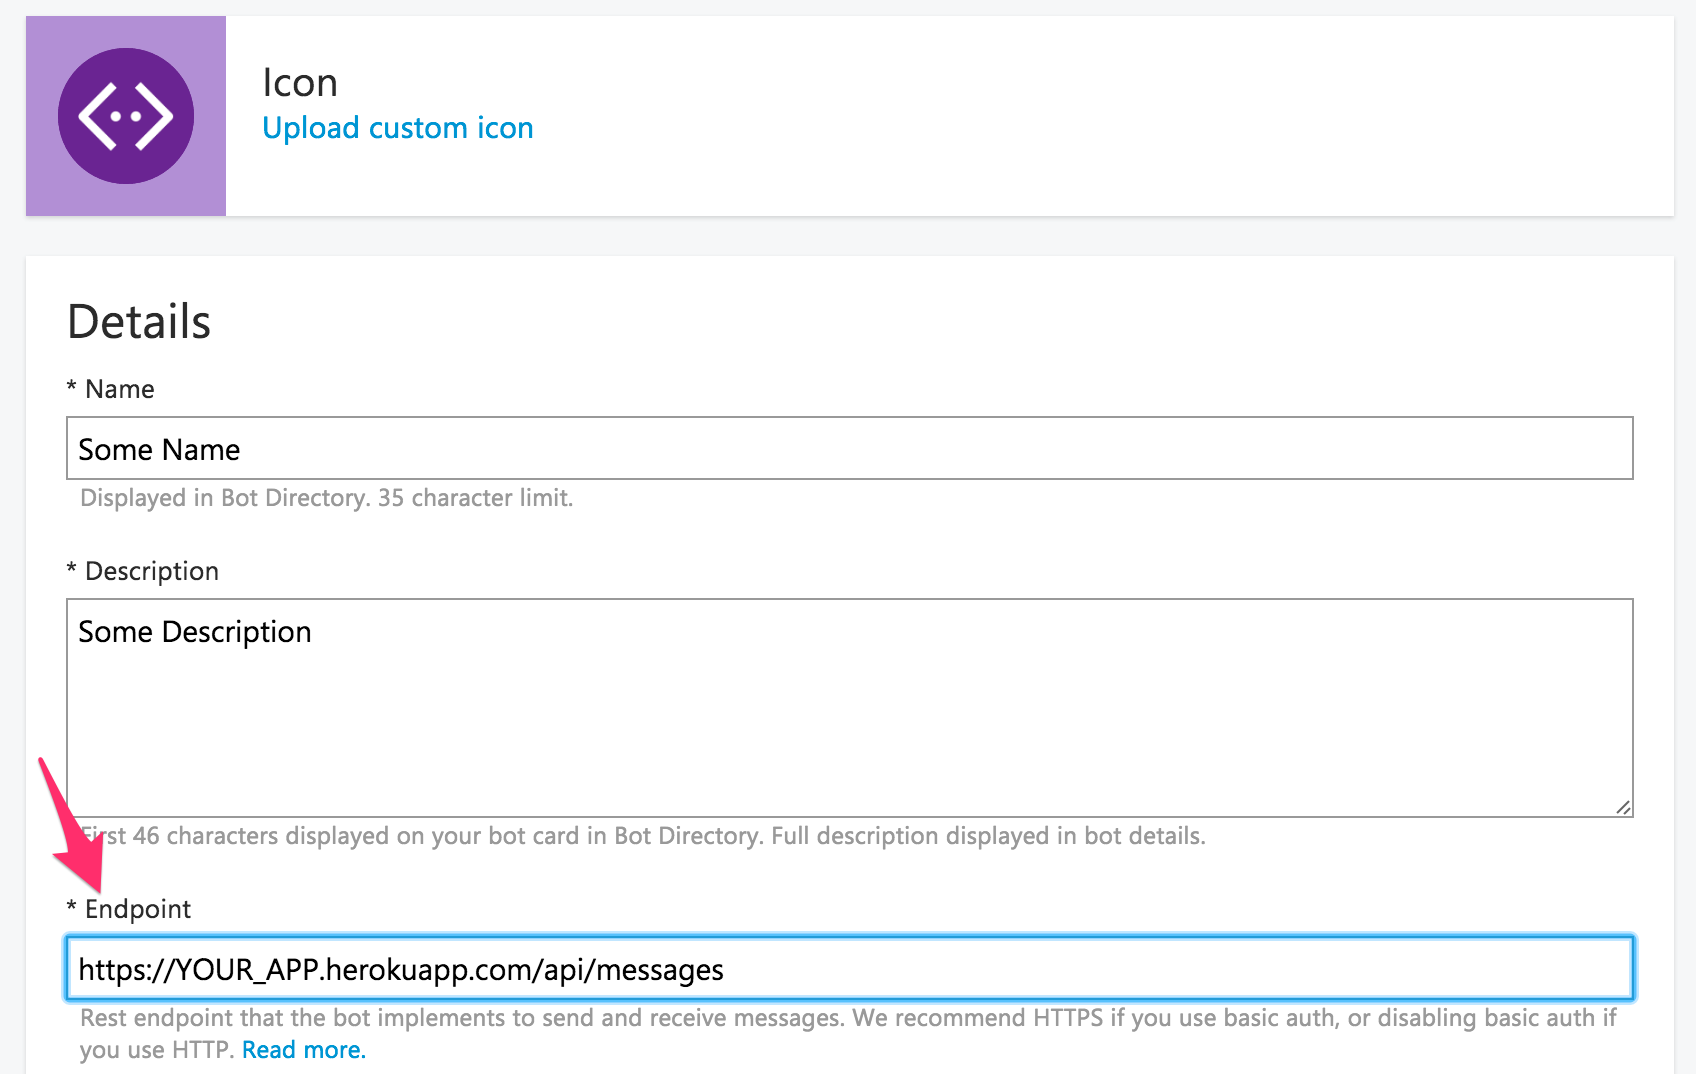
Go to Register bot and fill up the form to register your bot. Make sure your endpoint looks something like this https://YOUR_APP.herokuapp.com/api/messages. It should be https otherwise MBF does not send over the credentials and the bot service expects any incoming request to have Authorization header in the request with valid credentials.
Once you create the bot add the secrets to your Heroku app by running the following in terminal
heroku config:set APP_ID="Your bot app id"
heroku config:set APP_SECRET="Your bot app secret"
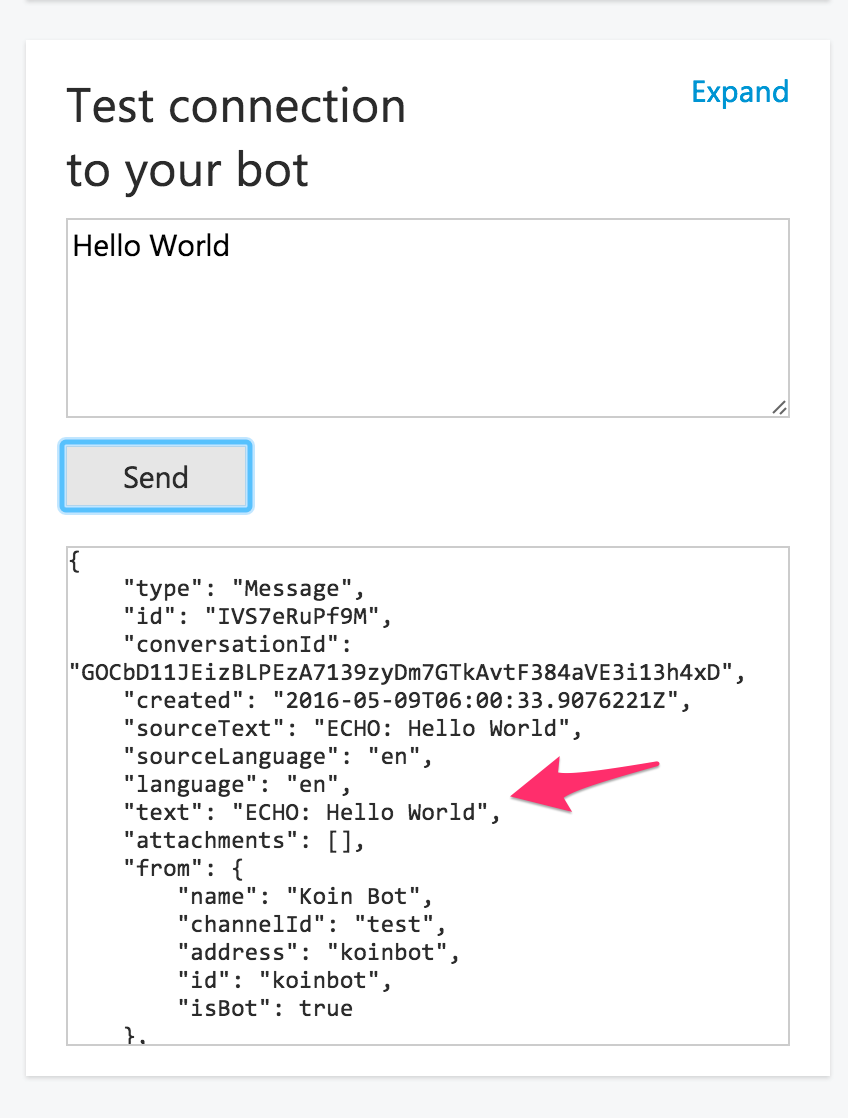
MBF provides a quick way to send messages to your bot and see its JSON response. Go to your MBF bot dashboard and then in Test connection to your bot write something and send it. You should see the response with the echoed text.
Register Facebook bot
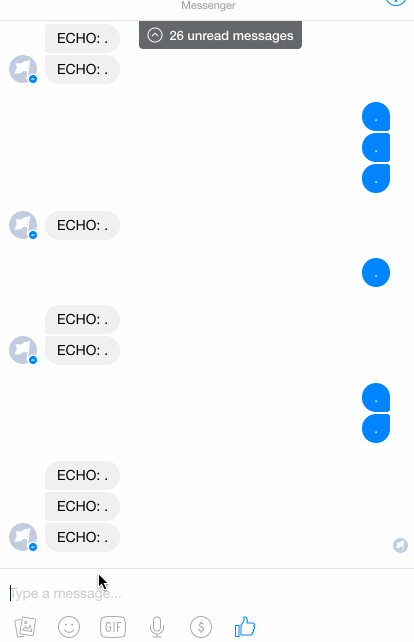
The last step is to register a Facebook bot and link it with the MBF. Go under your MBF bot dashboard and under the Add another channel click add in front of the Facebook, it will direct you to the list of things you need to do to create Facebook bot and link it with MBF. Once you are done with it, goto Facebook Messenger and search for the page created during the Facebook bot creation part. Send a message to that and see the message echoed back.
You have a complete echo bot running, sending messages to and from Facebook. You can add more channels to it if you want.
Sending message asynchronously
Currently our bot service returns back the reply we want to send back to user as part of the response, but if you have to do some computation e.g. getting weather and then send back the response , you can return 200 OK and later call the ExMicrosoftBot.Client.send_message/2 to send message back to the user. Let's send a delayed message to user.
Change your controller as follows
defmodule EchoBot.MessagesController do
  use MicrosoftBot.Phoenix.Controller
  alias ExMicrosoftBot.Models.Message
  alias ExMicrosoftBot.Client

  def message_received(conn, %Message{} = message) do
    {new_text, is_delayed} = get_echo_message(message.text)
    send_message_back(conn, message, new_text, is_delayed)
  end

  defp get_echo_message(nil) do
    {"ECHO: (empty)", false}
  end

  defp get_echo_message("delayed " <> _ = text) do
    {"ECHO: " <> text, true}
  end

  defp get_echo_message(text) do
    {"ECHO: " <> text, false}
  end

  defp send_message_back(conn, %Message{} = message, text, true) do
    spawn_sender(conn, message, text)
    resp(conn, 200, "")
  end

  defp send_message_back(_conn, %Message{} = _, text, false) do
    %{text: text}
  end

  defp spawn_sender(_conn, %Message{} = message, text) do
    spawn fn ->
      :timer.sleep(5000) # Wait for 5 seconds
      get_bot_auth_data
      |> Client.send_message(%{to: message.from, from: message.to, replyToMessageId: message.id, text: "DELAYED -> " <> text})
    end
  end

  defp get_bot_auth_data() do
    %ExMicrosoftBot.Models.AuthData{
      app_id: Application.get_env(:microsoftbot, :app_id),
      app_secret: Application.get_env(:microsoftbot, :app_secret)
    }
  end
end
Here if the user sends a message that starts with delayed we spawn a process that waits for 5 seconds and then calls the send_message/2 API with the message to send. The message contains to, from, replyMessageId and text fields.
Whats next
In the next part of the tutorial we will use Wit.ai APIs using elixir_wit to create a bot that can chat using the chatting model created in Wit.
